A house made of wood is a beautiful, cozy building, but easily combustible, requiring increased attention to the power supply process. Making electrical wiring with your own hands is not an easy task, but doable. You just need to approach the issue responsibly, in compliance with the rules and regulations.
Content
Requirements for wiring in a wooden house
Electrical wiring in a wooden house must meet the main requirement - to be safe.More than half of fires in buildings of this type occur due to a short circuit in the electrical network due to mechanical damage to the insulation or increased load on the cable.
You can eliminate the risk of fire if you follow the basic requirements:
- Proper selection of materials.
- Reliable isolation.
- Possibility of automatic interruption of power supply.
- Regular network diagnostics.
Compliance with these requirements will reduce the likelihood of ignition of wooden structures and ensure the safety of property in both city and country houses.
Regulations
Regulations governing the arrangement of electrical power in wooden buildings are contained in "Rules for electrical installations" (PUE) and in the Code of Practice "Design and installation of electrical installations of residential and public buildings".
They give criteria for choosing switchgears, conductors, automation, lighting, the terms used and their meaning are indicated.
Electrical wiring is still regulated by Building Codes and Rules (SNiP).
SNiP 3.05-06-85 describe how to enter a power cable into a living space, and SNiP 31-02 - requirements for the device of the power supply system in residential buildings.
Preparation of a power supply project
The first stage of the electrification of the facility is the preparation of the project. In a private house, drawing up a wiring diagram can be done on your own. To do this, you need a house plan with the placement of furniture, equipment, electrical appliances, the designation of sockets and switches. The place of installation of the switchboard and the passage of cable lines is noted.
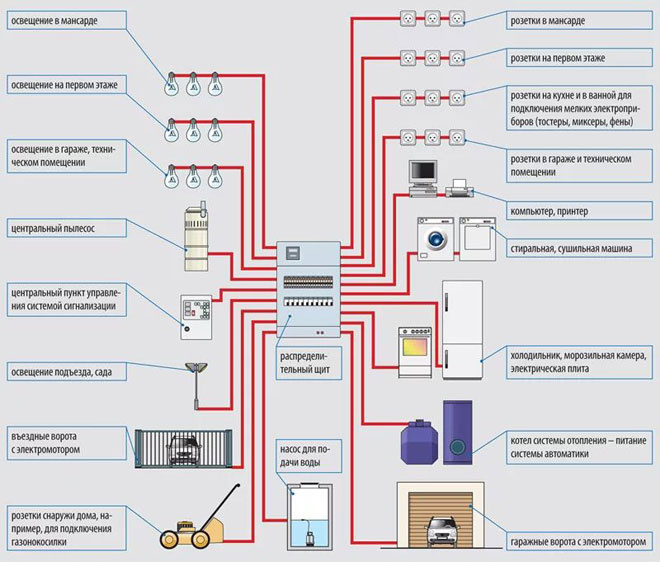
The location of the junction boxes is indicated, the maximum power consumption of energy by all devices, the total number of machines and the rated load on the introductory machine are calculated.
Cable selection
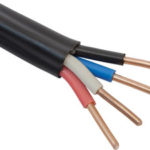
After drawing up the electrical circuit, you need to decide which wire to make the wiring in a wooden house: aluminum or copper. The first is cheaper, the second is more reliable. Having settled on aluminum, you need to remember that its cross section must be larger than copper, and it is brittle when bent. A more suitable material is copper, the wires of which can withstand temperatures from -50 to +50 ° C.
Having decided which cable is best for wiring in the house, you can go to the choice of its brand. For wooden structures, copper non-combustible wire VVG with solid cores and reduced smoke emission is more suitable. It has high anti-corrosion properties and does not deform under temperature changes.
When planning how to conduct wiring in a house, you need to remember the requirements of the Electrical Installation Code for the color of the insulation: the cable cores must be of different colors. This will simplify the process of installation, maintenance and repair.
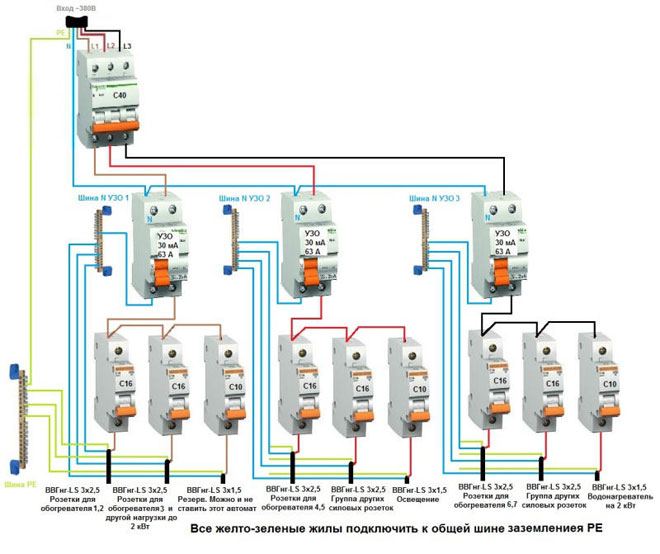
The choice of devices and automation for the switchboard
The purpose of selecting automatic protection devices is the safety of the network and equipment in emergency situations. Each device has its own purpose. All devices are located in the switchboard.
Circuit breakers protect against voltage overload and short circuit.
Residual current devices (RCD) - from the occurrence of fire and electric shock.
Voltage relay - from load fluctuations that affect the operation of devices.
Differential machines combine the functions of a circuit breaker and an RCD and save space when installed in a switchboard.
The integrated use of these devices guarantees reliable operation of the devices and the safety of people in the room.
Electrical wiring installation - step by step instructions
Installation of electrical wiring in a private house requires preliminary preparation and compliance with step-by-step instructions, consisting of the following steps:
- project development and determination of the total capacity of the equipment;
- selection of cable, automation devices and electrical appliances;
- power supply, connection of circuit breakers, electricity meter;
- installation of an electrical panel;
- internal cabling;
- installation of sockets, switches, lighting devices;
- system test.
Such a sequence will show how to properly wire the wiring in the house, and ensure the reliability of its operation. It is important to remember that each step must be carried out in compliance with safety rules: de-energize the room in which work is carried out, do not use bare wires, place all connections and branches in boxes, lay the cable either vertically or horizontally, preventing it from crossing.
Following the step-by-step instructions will allow you to complete the installation efficiently.
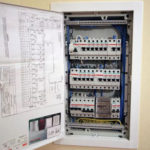
Switchboard installation
The switchboard is designed to receive and distribute electricity in the room. With its installation, all electrical work begins. It does not matter whether the wiring is carried out in a country house, a city cottage or a rural log house.
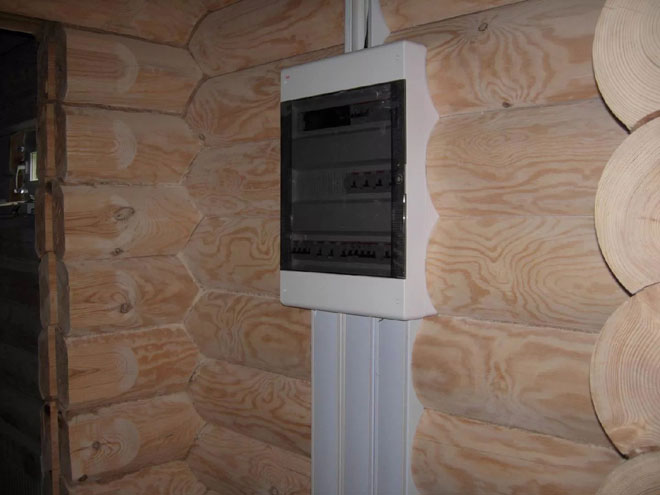
The shield must be made of non-combustible material, placed in a dry place and locked with a key. Rooms with high humidity cannot be located above it (shower room, bathroom, bathroom), and within a radius of half a meter - heating equipment, water and gas supply systems.
An electric meter, an introductory machine, an RCD, grounding buses, voltage relays and machines for different power groups are mounted in the shield.
Grounding device
Any modern house is equipped with household appliances in a metal case, and the possible contact of metal with electricity requires grounding - protecting a person from electric shock through electrical appliances.
Grounding in a private house can be done on your own.
A trench 30 cm deep is dug in the form of an equilateral triangle with a side of 1 m. Pins 3 m long and 3 cm in diameter are driven in at the corners, which are interconnected by a corner by welding.
A hole is cut in one of the corners, a ground wire is attached with a bolt and nut, which is connected to the busbar in the switchboard. Earthing conductors of cables in yellow-green insulation are attached to this bus.
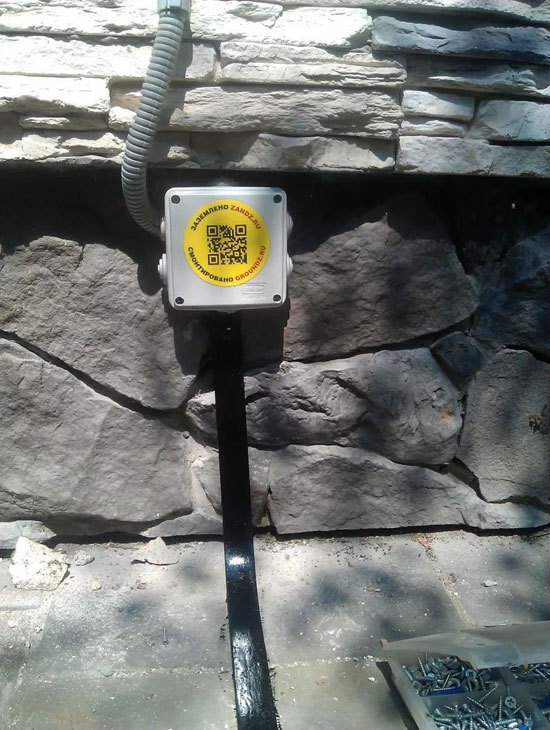
Entering the power cable into the room
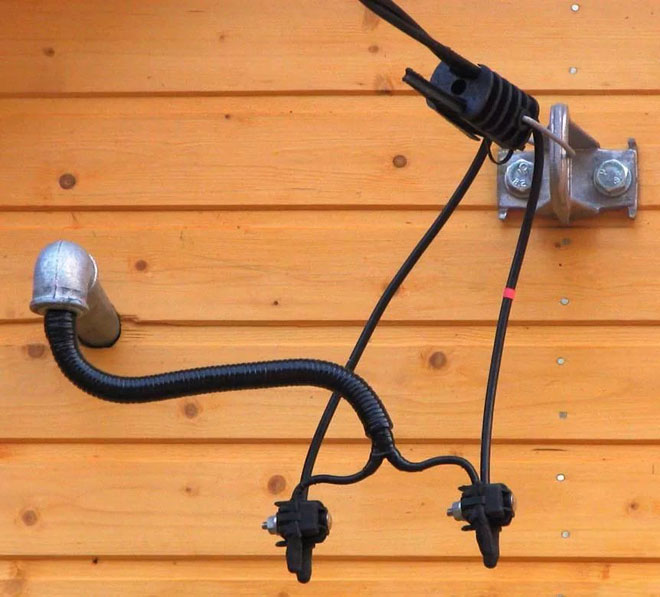
Electricity enters the building through a power cable that enters the switchboard. There are two ways to carry out its supply: air and underground.
In the first case, the cable is brought through the air from the electric pole to the house, where it is attached to porcelain fittings. This method is simple and cheap, but has a number of disadvantages: less durable, high probability of damage to the wire by wind, snow, branches.
The underground method is more reliable, but more laborious and expensive. A trench is dug, where an armored cable or in metal pipes is laid. A layer of sand 20 cm thick is poured on top, a signal tape is laid, and the trench is buried.
Power cable - the main element of the wiring, because it bears the load from all electrical appliances in the house.

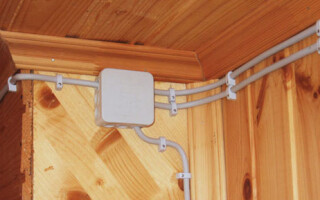
Cable laying and connection
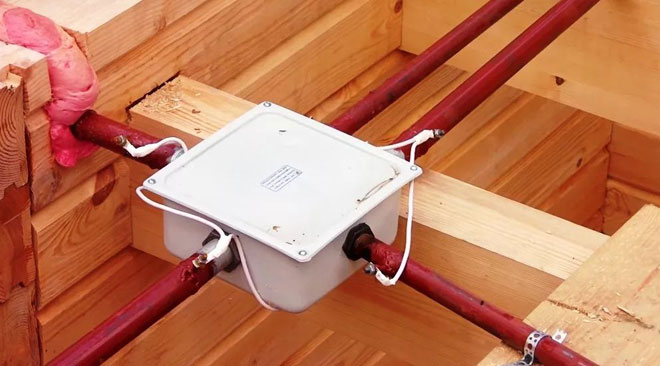
Installation of electrical wiring in a private house is carried out along the routes indicated in the project scheme. Junction boxes are mounted on it, fixed socket attachment points, switches, lighting fixtures. In buildings made of wood, wires are used only with special markings, the insulation of which does not ignite even at high temperatures.
"Twisting", "temporaries" are not allowed. The number of turns and bends is best minimized. Where possible, run a whole wire from the machine to the end point.
When doing the installation of electrical wiring in a wooden house with your own hands, you must remember that the boxes cannot be closed with decorative panels or ceilings that make it difficult to access for maintenance.
Installation of switches and sockets
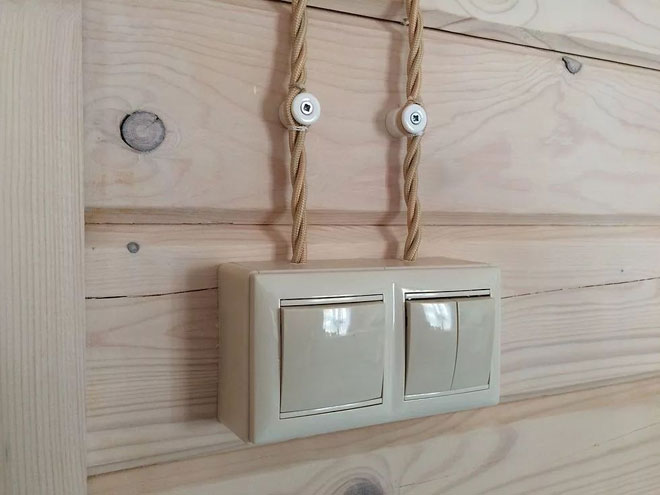
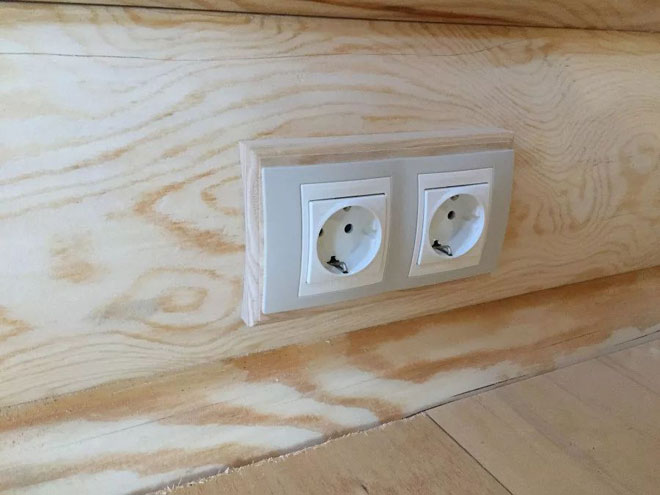
Overhead sockets and switches are selected based on the calculated current and the possibility of connecting under one frame. Before installation, turn off the power and make sure that there is no voltage in the cable.
The safest way to fix switches and sockets in a wooden structure is to mount them on metal substrates. This will protect against possible sparks when shorted or arcs when the plug is removed. For a wooden house, it is preferable to carbolite, rather than plastic, devices that have great heat resistance and can withstand strong heat.
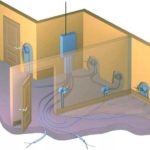
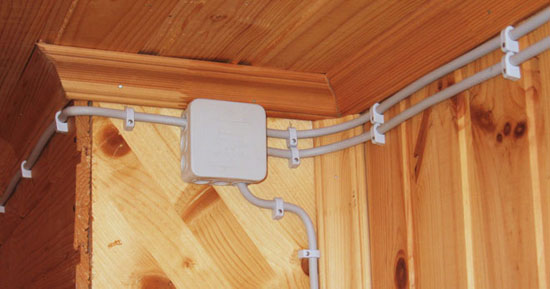
Methods for open wiring
Open wiring in a wooden house is laid on the inside of the room.The main requirement is that the wire does not directly touch the walls, ceiling or floor and is protected: it is located in the middle of the channel, pipe or has several layers of insulation. Pipes and channels must be made of materials that do not support combustion.
Installation of wiring in a wooden house can be done in several ways:
- In a corrugated pipe made of PVC;
- In a metal hose;
- In PVC pipes or boxes;
- On staples;
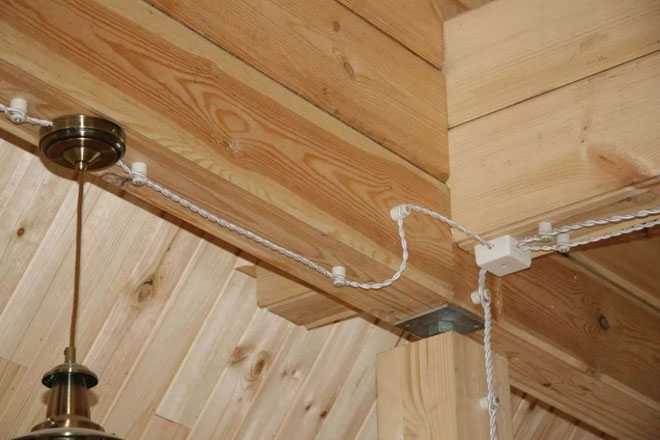
- on ceramic insulators.
The most common options are the use of corrugated pipes and cable channels.
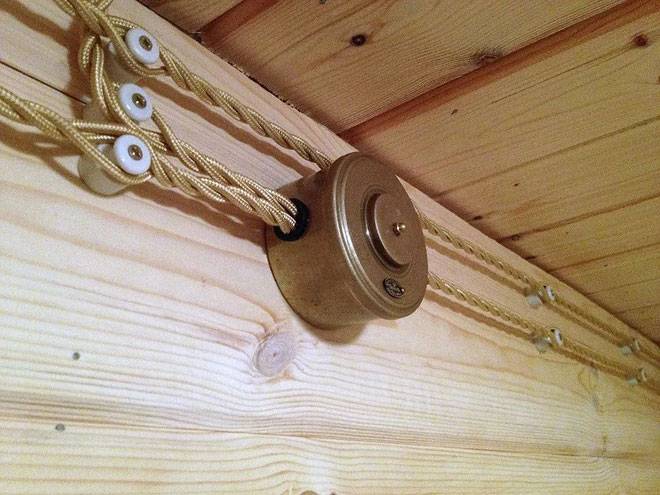
The use of ceramic insulators or "retro style”, when air space remains between the twisted electrical wire and the wall. This option also decorates the home.
Open wiring in a wooden house can combine several options. On walls and ceilings that have a flat surface, you can use plastic boxes, and in other areas - corrugated pipes.
Hidden wiring in a wooden house
Internal wiring in a wooden house has its advantages and disadvantages. The advantage is the absence of corrugated pipes and cable channels that spoil the appearance of the room. There is no risk of mechanical damage to the cable. On the other hand, the complexity of installation, increased requirements for fire safety, additional financial costs.
Unlike external wiring, it is more difficult to conduct internal wiring in a wooden house. To do this, you need to know more requirements and nuances related to this type of power supply arrangement.
Hidden wiring should not have many turns, because. the cable must be laid in steel or copper pipes.The use of metal hoses and PVC corrugations is allowed only when they are protected with plaster or asbestos lining.
If a special tool is not required for the installation of external wiring, then it is necessary for a hidden one. It is necessary to drill in horizontal and vertical directions, cutting out seats for insulating boxes. You will have to pull not only wires and cables, but also a large number of steel or copper pipes. The latter fit better, because they bend well, taking the desired shape.
You can conduct wiring in the house with your own hands in an open and closed way. This is done in places where the wire is connected to switches or sockets.
Mounting errors
Typical mistakes when laying the electrical network in the premises:
- bending or weakening of the supply cable;
- fastening the wire to a wooden structure, which is prohibited by the rules;
- installation of hidden wiring using corrugated pipes, metal hoses and plastic boxes;
- installation of the switchboard too close to the power cable entry point;
- the number of automata is calculated incorrectly: either more or less than necessary.
Wiring test
After installation, the wiring must be tested: conduct a visual inspection, measure the insulation resistance and the ground wire, check the operation of circuit breakers, RCDs or difavtomatov. The reliability of the electrical network must be maximum, because. electrical wiring requires increased attention and regular monitoring.
Similar articles: