If it is necessary to conduct electrical wiring in the apartment, a plan is drawn up with the placement of all elements of the future network: sockets, switches, cable routes and nodal distribution and protection systems. Before starting work, you need to purchase the necessary materials and prepare tools. To understand how to lay the wiring, it is worth familiarizing yourself with each stage of the work in more detail.
Content
Design and calculation
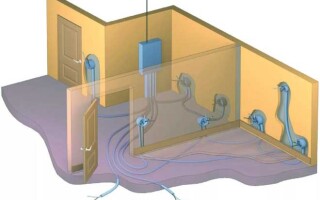
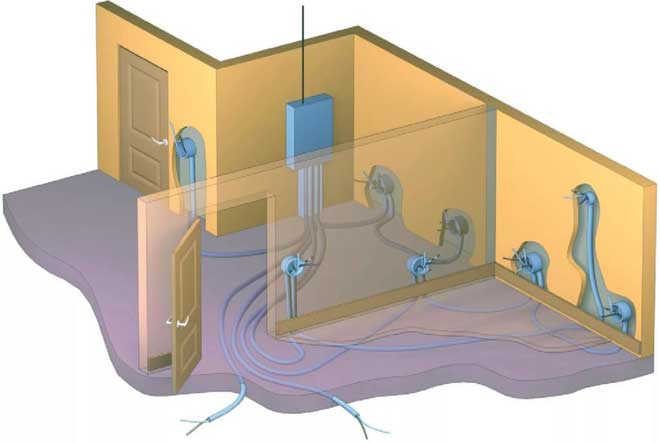
To make the wiring in the apartment, you need to draw up a plan, taking into account the needs for providing electricity to all major appliances. When compiling it, the rules for installing electrical wiring in an apartment should be taken into account, which are as follows:
- Electrical cable runs must run vertically and horizontally.
- Turns of tracks should be carried out only at right angles.
- It is desirable to install at least 1 junction box per 1 room.
- New wiring in the apartment should be bred taking into account the location of large household appliances: a refrigerator, a washing machine, a home theater, etc.
- An emergency shutdown device (RCD) is required, otherwise it will be unsafe to use electricity.

When determining the means of RCD, it is necessary to take into account the principle of selectivity. It defines the rules for the installation and combination of protective equipment and their operation. In this case, the power supply system is divided into zones, for which the corresponding machines are responsible. There are two main types:
- Absolute, with it 1 RCD node is responsible only for its zone.
- Relative, in this version, the RCD machine can turn off the current at any danger factor, not only in its own zone, but also in the neighboring one, this technique has additional functions that counteract false triggering:
- time delay for shutdown;
- settings for voltage, frequency, resistance, power and other parameters, within which the trip does not occur.
Although the principles and rules are common, the electrical wiring in a one-room apartment and a three-room apartment will differ, for example, in the complexity of the layout and individual nuances. To understand how to calculate electrical wiring, it is worth reading the further more detailed consideration of each element of the system.
Main elements
When drawing up a plan, not only sockets, switches and standard wires for wiring in an apartment should be taken into account, but also such mandatory elements of the system as:
- supply of electricity from the general electrical system;
- electric meter and automatic RCDs;
- electrical panel with the distribution of consumer groups;
- room lighting;
- power group (high-current electrical wiring in the apartment serves high-power household appliances, such as a boiler and a washing machine).
Calculation of the nominal value of machines
To ensure safety, the electrical wiring diagram of the apartment wiring involves the installation of RCDs, special means that protect against current leakage or contact with the phase wire. The calculation of their number and protection class is based on the area of the apartment. RCDs are installed in the following proportion:
- less than 35 sq.m - 1 residual current device class AC ** + 1 RCD 40 A class A ***;
- 35-100 sq.m - 2 RCDs of class AC** + 1 RCD 40 A of class A***;
- more than 100 sq.m - 3 RCDs of AC class ** + 1 RCD 40 A of class A **.
How best to wire
If you need to conduct or change the wiring in the apartment, you first need to decide on the method by which this will be done. To understand how to lay electrical wiring, you need to evaluate the features of each of the options. There are such mounting options:
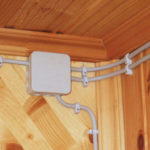
- In an open way, boxes, skirting boards, a special cable on porcelain insulators can be used. To do this, you need to: calculate the format and volume of each type of electrical cable: power, lighting and low-current. Create a standard wiring diagram. Use flat wire brand APVR, APR, APPV.
- in a closed way. More complex installation with camouflage of cable routes. According to the markings, strobes are cut out in the wall, recesses for sockets, switches and distribution boxes are drilled. Boxes and socket boxes are mounted, fixed with plaster or other means. Cables are laid in the strobes and fixed by the chosen method in increments of about 40 cm.Sockets and switches are installed.
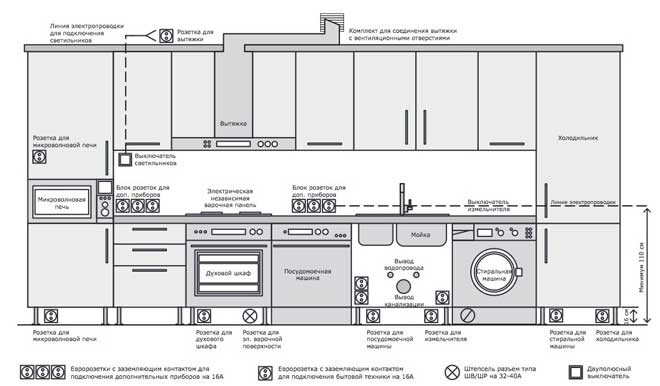
Location of outlets
When installing switches and sockets, it is worth observing a few rules, following which can make their further operation safer:
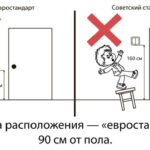
- You should not install sockets directly at the floor, it is better to raise them a short distance, which will prevent electric shock if the floor is flooded with water in the room.
- Do not place sockets closer than 50 cm from gas and electric stoves.
- It is better not to install sockets in the bathroom. In case of emergency, it is advisable to maintain a distance of 2.5 m from the water source.
There are two types of installation of sockets: open and hidden. In the first case, it is necessary to install a socket in the wall. For a hidden type, first the sockets are mounted in installation boxes, and then into the wall.
Definition of cable routes
To lay cable routes, you must follow certain rules, and in addition, decide which wire is needed. Its specificity and dimensions determine the dimensions of the strobe and fasteners. Some of the rules are already indicated in the paragraph on drawing up a plan diagram, otherwise the electrical wiring in the apartment is laid with your own hands in accordance with the following instructions:
- The cable route and connection points should not be located near heat: radiators, stoves, etc., the minimum distance is 0.5 m.
- The minimum distance from the windows is 10 cm.
- It is not recommended to mount the wiring in the apartment along the ceiling, in addition to providing power to the lighting fixtures, the optimal location is the space on the wall 15 cm from the ceiling.
The cable is selected based on the following recommendations:
- copper is better than aluminum;
- preference is given to 2- and 3-wire wires marked VVG and VVG NG with a cross section of at least 2.5 sq. mm for sockets and 1.5 sq. mm for supplying current to lighting fixtures, and sockets from which powerful electrical appliances will be powered, it is better to power through cables with a cross section of 4 sq. mm;
- the standard ratio of the cross section to the power consumption is 0.5-0.9 sq. mm per 1 kW.
Necessary materials and tools for installation
Before laying the cable for electrical wiring in the apartment, you need to prepare all the necessary materials. This list includes:
- UZO-machines or difautomats;
- cable: power, low current, lighting;
- terminal blocks;
- branch boxes;
- sockets and switches;
- gypsum mortar;
- socket boxes;
- glue;
- mounting means: self-tapping screws, screws;
- electrical cardboard;
- profile or tube for cable protection.
In addition, you will need the following tools:
- angle grinder with diamond discs;
- chisel nozzle;
- perforator and screwdriver;
- a hammer
- knife and scissors;
- roulette;
- small spatula;
- pliers.
The cable for wiring in the apartment is purchased in quantities that take into account the total length of the cable routes according to the plan plus 15 cm at each connection point of the elements, for example, with a shield or socket. The number of sockets and switches is also determined according to the developed scheme. The material for boxes, socket boxes and similar elements must be made of non-combustible or self-extinguishing polymer with minimal electrical conductivity.
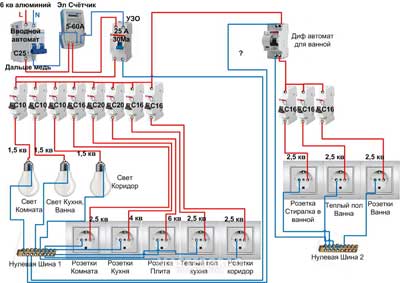
Installation and connection of the electrical panel
The switchboard is a nodal connection consisting of a housing and an internal filling, including the following:
- electricity meter;
- main circuit breaker;
- automatic RCDs;
- automatic disconnection devices for individual power supply zones;
- distribution bus;
- zero bus;
- ground bus.
The placement of the lighting shield is carried out taking into account the length of the wires from each line, their thickness and further installation. Installation goes in this order:
- The RCD differential device, distribution machines and other modules are fixed on mounting rails, taking into account network groups.
- Phase and neutral tires are connected to the machines.
- Zero and phase cables from the main switch are connected to the RCD.
- The RCD is connected to the distribution busbars.
- Wires with phase and zero from each line are connected to their respective modules.
- Ground wires from each line are connected to the zero bus.
- The connection of the zero bus and the ground rod is checked.
- Connecting wires for each line, connected to all modules, are removed from the shield through the holes made in the required directions.
Wiring
Replacing the electrical wiring in the apartment with your own hands, as well as laying new cable routes, is a simple matter. At the preliminary stage, the installation sites of sockets and switches, as well as the laying of cable routes, are marked. Next you need:
- Using a puncher with a special crown, file 5 mm recesses at the locations of sockets and switches.
- The crown changes to a drill, and a recess the size of a cup holder is drilled along the notches.
- A crown is placed again to align the walls.
- A chisel nozzle is installed to punch a strobe in the wall under a corrugated profile or a pipe with a cable, the groove should be 20 mm wider than the selected option.
- The cable in the protective casing is laid along the strobes; a gypsum solution is suitable for tacking.
These recommendations will help you lay the wiring with your own hands.
Similar articles: