To improve the quality of life, its convenience and comfort, mankind has created a huge variety of different devices and devices. One of them is a photo relay, designed to turn on and off the light at certain times of the day, filling dark spaces with a cozy glow in the evening and leaving room for sunlight in the early morning.
Content
What is a photorelay?
This device does not have a single clear name - there are such names as a light and twilight sensor, a photocell, a photosensor, a photo sensor, a light control switch or a light sensor. But all these names do not change the main purpose of this device - turning on the lighting at dusk, as well as turning it off at dawn.
The principle of operation is to change the parameters of some components under the influence of sunlight.As long as enough light falls on them, the circuit continues to be open. At the onset of darkness, the parameters of the photoresistors change and, at certain readings of the potentiometer, the circuit closes. At dawn, the situation changes diametrically opposite - at a certain value, the circuit opens, and the relay turns off street lighting.
Advantages of a photorelay for street lighting
This outdoor light control device has a number of undeniable advantages, among which are:
- Convenience in everyday life: now you do not need to go through the courtyard, immersed in pitch darkness, in order to open the front door - at dusk, the photorelay independently activates the lighting system.
- Save energy: Residents of country houses often forget to turn off the lights when they go to bed or leave the house. Now, the light will be turned off with the first glimpses of the sun using a standard photo sensor, provided there are no people in the house - using a sensitive sensor with motion detection, and at a certain time - a specially programmed one.
- Imitation of the presence of the owners: since the main factor in the presence of people in the house is the switched on light, thieves and vandals will not dare to enter the house.

How does a photorelay work?
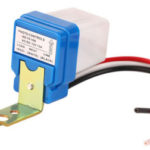
An integral component of any photorelay is a photo sensor that changes its properties under the influence of a stream of light. Further, the photo sensor is connected to the control board, which is responsible for all the necessary functions and controls the state of the device.
There is a wide variety of modifications of sensors with a different set of additional characteristics. So, they distinguish:
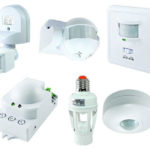
- Photo relay with motion sensor: turn on the lighting if there is any movement in the visible zone.In combination with a photo sensor, it works only at night.
- Photo relay with motion sensor and timer: the sensor is so finely tuned that it subsequently triggers at a certain moment - for example, at certain time intervals or when someone approaches the house.
- Photo relay with timer: it becomes possible to save energy by turning off the light at unused intervals.
- Photorelay with the possibility of programming: is considered the most expensive and functional type of light sensors. This view provides the ability to configure the on / off lighting depending on the level of natural light, day of the week or season.
Also, day-night sensors differ in type of execution. For example:
- Photo relay outdoor installation: the device is often installed on the wall of the house. Such a photo sensor has a sealed housing, which is made of heat-resistant plastic.
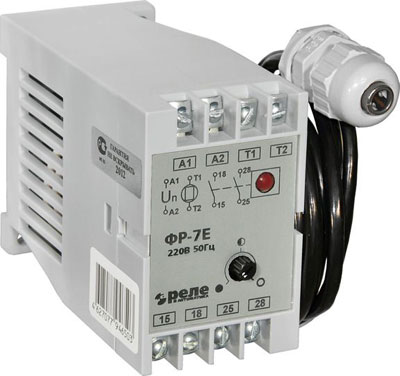
- Photo relay for indoor installation: installation takes place in the main electrical panel of the house by mounting on a DIN rail. This also includes a remote photo sensor, which is attached to the facade and connected to the unit using two wires. Since it is necessary to break through the wall to lay the necessary wiring, this type of photo relay is recommended to be installed at the construction or repair stage.
Specifications
When choosing the necessary equipment, it is necessary to take into account the following characteristics that determine the functionality:
- Voltage: 220 V or 12 V sensors are considered the most common. Often they are selected according to the type of voltage that powers the outdoor lighting.12V sensors are also used in conjunction with batteries.
- Operating mode: it is recommended to select a day-night sensor depending on the temperature characteristics of your region. In addition, it is worth choosing a device with a wider temperature range in case of unexpectedly large differences.
- Housing protection class: for outdoor installation, it is advised to choose class IP 44 or higher. For indoor installation, IP 23 is recommended. This classification prescribes protection against ingress of solid particles with a diameter of more than 1 mm, as well as splash water. It is not recommended to choose a photo relay for outdoor installation with a lower protection class.
- Load power: each photo relay has its own load power limits. The total power of the connected lamps, which is 20% less, is considered optimal. During operation, the limit of functionality is not reached, therefore, it has a long service life.
These parameters are certainly important, but it is also necessary to take into account the following characteristics, as adjustment parameters that can optimize the operation of the photorelay, making it more economical and efficient. These characteristics include the following:
- Threshold: This parameter increases or decreases the sensitivity. It is recommended to lower the sensitivity level for the winter period, as well as in cities, provided that brightly lit buildings are located nearby.
- Delay to turn on and off (sec.): when the delay threshold is increased, protection against false triggering from the influence of a third-party light source, such as car headlights, occurs. In addition, this setting prevents turning off street lighting when obscured by clouds or shadows of a different nature.
- Illumination range: sets the level of illumination at which the photo sensor gives a signal to turn the power on or off. These bounds are called the lower and upper bounds of the illumination. The presented range ranges from 2-100 Lx (at 2 Lx complete darkness sets in) to 20-80 Lx (20 Lx - twilight with the condition of visibility of the outlines of objects).
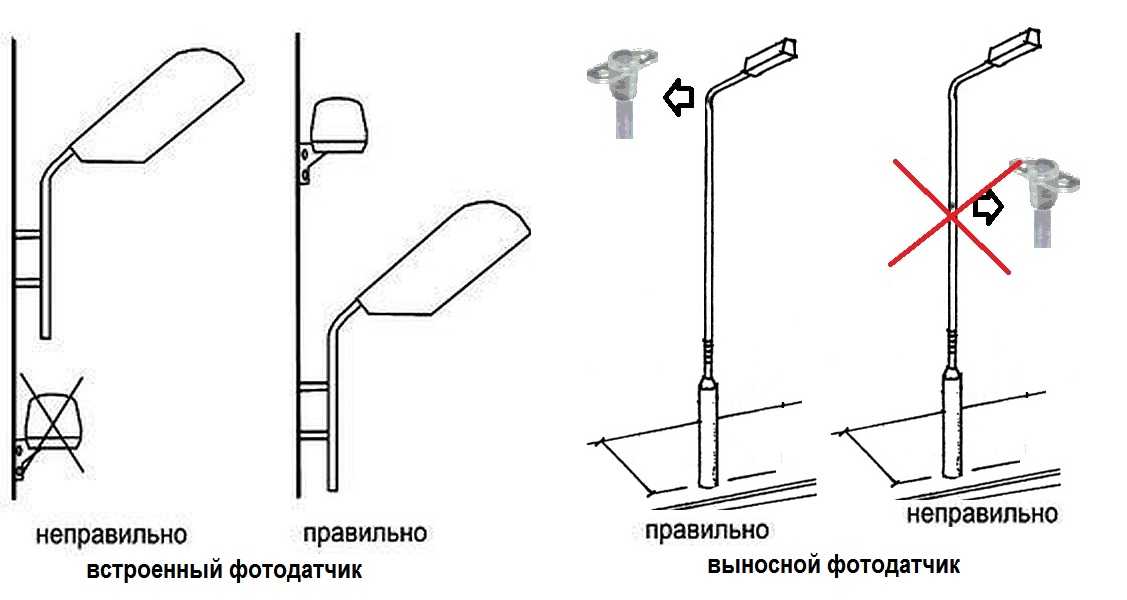
Where is the best place to mount the photo sensor?
Also important is the selection of the installation site of the equipment. In doing so, the following aspects must be satisfied:
- The need to hit the daylight sensor, provided that it is remote.
- The location of light sources that can distort the operation of the photo relay (lanterns, luminous signs, windows, billboards) - it is important that the photo sensor does not respond to these stimuli, turn them on and off.
- Minimizing the influence of car headlights.
- The height of the location of the photo sensor - the most optimal height is considered to be 1.8-2 m.
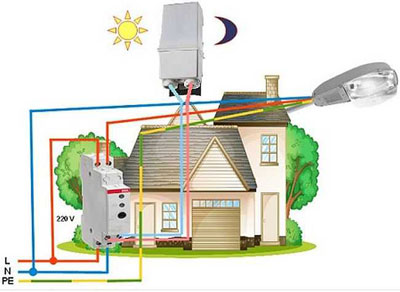
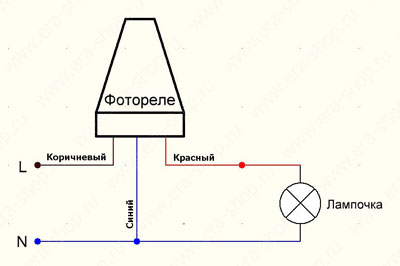
Photorelay connection diagram
The main task of the remote photo sensor is to supply power to the lighting system in the absence of natural light, as well as turn it off when the amount is right. The photo relay is used as a kind of switch, in which the main role is played by the photosensitive element. Based on this, its connection scheme is similar to the connection scheme of a conventional electrical network - a phase is supplied to the day-night sensor, which is transmitted to the lighting system.
In addition, for proper operation, a power supply is required, zero is applied to the necessary contacts. The installation of grounding will also be important.
An important parameter described above was the power of the input load.Therefore, it is recommended to apply voltage to the photo relay through a magnetic starter. Its task is to frequently turn off or turn on the electrical network in which the photosensitive element is located, which has a small connected load. And more powerful loads can be connected to the conclusions of the magnetic starter.
Provided that, in addition to the sensor, it is necessary to connect additional devices, such as a timer or motion sensor, they are in the connection network after the photocell. In this case, the order of installation of the timer or motion sensor does not matter.
The connection of wires must be carried out in the installation roomjunction box, which is mounted in any convenient place on the street. It is recommended to select sealed models of boxes.
In addition, this device has features for connecting wiring. Each photorelay is equipped with three wires: red, blue\dark green, black\brown. Wire colors prescribe their order of connection. So, in any case, the red wire is connected to the lamps, the blue / dark green wire connects zero from the supply cable to itself, and the phase is often supplied to black / brown.
Connecting a photorelay with a remote sensor
This connection option has some differences. So, the phase is connected to terminal A1 (L), which is located at the top of the device. Zero is connected to terminal A2 (N). Depending on the model, from the outlet, which can be located at the top of the housing (designation L`) or at the bottom, the phase is fed to the lighting system.
How to set up a photo relay
The tincture of the photo sensor is carried out after its installation and connection to the general electrical network.The droop limits are adjusted by rotating the small plastic disc at the bottom of the case. To select the direction of rotation - to increase or decrease - you should turn according to the direction of the arrows that are visible on the disk: to the left - decrease, to the right - increase.
The most optimal sensitivity adjustment algorithm is as follows. First, by turning the sensitivity dial all the way to the right, the lowest sensitivity is set. At dusk, it is recommended to start the adjustment. To do this, turn the adjustment dial smoothly to the left until the light turns on. This completes the setup of the photo sensor.
Similar articles: